
Tutorial Menu: Fitting A Halter
Article by Susan Hargrove, Oh Joy Farms

Don’t Ruin Your Model’s Appearance With A Poorly Fitted Halter!
You’ve finally purchased your favorite stock-horse model... MINT condition... and are ready to take a show photo. You decide to put a silver show halter on your model... this simple decision could essentially eliminate your model from the competition if the halter is not adjusted properly! Unfortunately, something as easily changed as the halter-fit can ruin the picture... especially if the halter hangs loose and gives an overall sloppy appearance
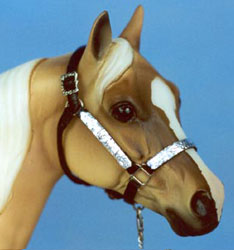
How should the halter fit? The halter should conform to the model’s head... fitting snugly behind the jaw and under the throatlatch.
a) The noseband should be positioned approximately halfway between the eyes and the nostrils. Common Mistakes: 1) having the check piece too long...placing the noseband too low on the model’s head; 2) the diameter of the noseband is too small...causing it to remain too low on the horses head.
b) The cheek piece should be parallel to the cheekbone on the horse. Common Mistake: Having the throatlatch too short...making it impossible to put the cheek piece in the correct "parallel" position.
c) The crown strap should fit "closely" behind the horse’s ears...but not so close as to pinch them!!
d) The connector-strap between the chin strap and the throatlatch should fit "snugly" along the under side of the model’s head.
What about chains? Chains over the nose cause the halter to "pop up" over the ridge of the nose...which detracts from a smooth appearance. If you insist on using a chain in a "control-type" fashion...it would be better to run the chain under the chin and up the right side of the halter. However, in our world of "miniature" equines where "control" is not an issue, a better choice would be to simply "loop" the chain portion of the lead shank through the center slot on the chin strap of the halter and attach the snap to the ring where the chain joins the leather!
Remember...just because the "proportions" of the halter are correct for your model...the design may not be the most flattering for your model’s head. The thickness of the leather... width of the straps... and placement and size of the silver give each halter a unique appearance.
NOTE: The trend in "model" showing is NOT to show your "halter" horses with a halter! Halters are reserved for showmanship, halter obstacle, etc.
Common Mistakes

Crown strap is too long and the throatlatch is too short causing... 1) the cheek piece to be much to low on the side of the head... and 2) the noseband to be too close to the nostrils!

Adjusting the crown strap to the proper length corrects the other "fit" problems with this halter.

Again...the crown strap has been adjusted much too long...causing 1) the throatlatch and chin strap/throatlatch connector to hang loosely under the head...2) the cheek piece to be out of position and 3) the noseband to be must too close to the nostrils.
Again... just by adjusting the crown strap correctly... all of the other "fit" problems of this halter have been eliminated.

Another example of the crown piece being adjusted TOO long...causing the halter to detract from the appearance of the model rather than "enhance" it!

Simply by adjusting the crown piece correctly...the halter now is an attractive addition to the model.

A lovely halter that is just the wrong size for this model!! The crown strap is adjusted correctly... but the cheek piece is TOO long... causing the noseband to rest too close to the nostrils.

Another beautiful halter that is not appropriate for this model. There is no way to adjust the straps so the halter will fit the model correctly!