
Tutorial Menu: Building A Frame Armature
Article by Laura Skillern, Don't Eat The Paint
Some of you may already be familiar with building a frame for an original sculpture. I believe JAH has covered the topic a couple times, but it’s also a straight forward process:
Twist together three pieces of sculpture wire.


This took roughly 4 seconds. The proportions are probably off.
From the strands, form four legs, a neck, a head, and a tail.
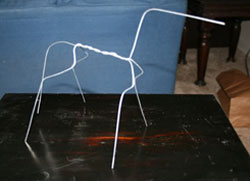

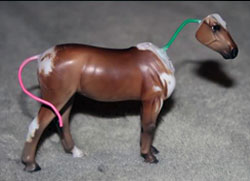
Measure the proportions or overlay your armature on a reference photo (or a couple to be safe, but never use a photo that is of a horse at an angle). Remember to mimic the shape of a horse’s skeleton. The armature is represented here in red.


Tweak the wire to fit, cut the excess and ta da! Instant armature.
Alas, building an armature for a custom model is not nearly so cut and dry.
On a custom, especially a drastic, you have two major problems to contend with. First, the parts you save from the original body won’t imitate a skeleton yet you’ll have to figure out how to attach a wire skeleton to them.
Second, securing wire to plastic is just hard.
Unless you are working with a solid cast resin or a stablemate, you have a third issue in that the model is hollow and you want to avoid filling the entire body with clay. For one, it’s a waste of clay. Clay is kinda spendy and I’m (as has been previously discussed) extremely cheap. And the finished product will weigh a ton.
I work around these problems using masking tape. Yup, Scotch blue painters tape.
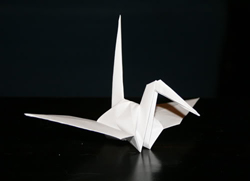
Think of this as the origami phase of sculpting. An origami crane, hat, or jumping frog won’t hold up to a lot of abuse, but it is rigid enough to hold a basic shape. You spent kindergarten learning to color inside the lines. I learned this.
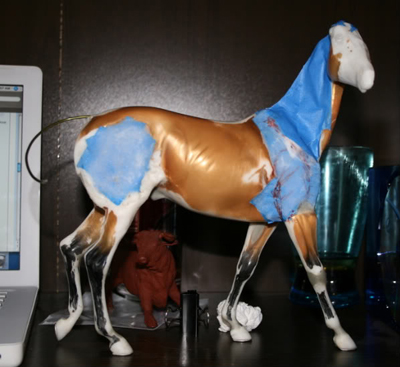
With the scotch tape, you just want to create a basic shape. This shape should form more of the silhouette of the portion you intend to sculpt without interfering or poking out of the surface of the final clay layer. To be safe, I try to keep the frame at least ½ cm (1/4 of an inch) below the surface. You still want to create the shape of the portion you are replacing (the neck, tail, butt, etc.) but just a tiny bit smaller.
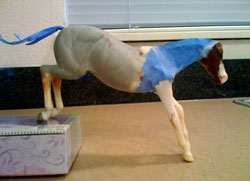
Before and after on one custom? It was a happy accident that I thought to photograph it.
(right) In progress frame (it's not a horse.)

When possible, I try to include at least a little wire secured to the original plastic parts. Like I said, this is hard and my best advice for this step is patience. I attach the wire to the inside of body and secure it in place with several layers of baking soda/super glue.
Baking soda/super glue often is not enough to hold the wire permanently in place. I delicately build a few pieces of masking on and around the wire. Then, on top of the masking tape, I stabilize the whole contraption with a few layers of baking soda/super glue.
Detail of the base of the neck secured in place.
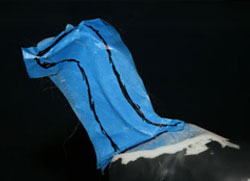

(right) The tail secured, before building the shape of the tail with tape. (left) This is two layers of tape. It could use one or two more.
I use multiple layers of masking tape--one layer of tape will not sufficiently hold its shape. Two to four layers are generally ideal. Two to three layers of baking soda/super glue is usually enough to create a sturdy surface to sculpt on without getting too bulky.
Depending on what part of the anatomy I’m replacing, I can either cut the tape into the right shape and then stick it on my model or I can stick on overly large strips of tape and then cut the tape down to size. I prefer the latter technique except when I need to squeeze tape into a small spot where my scissors won't fit.
In two weeks, we’ll apply this technique to manes and tails.